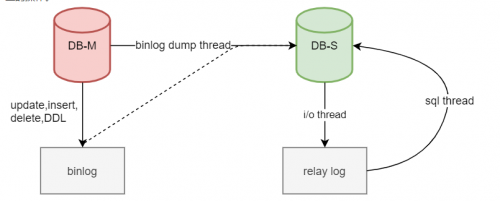
原理图:

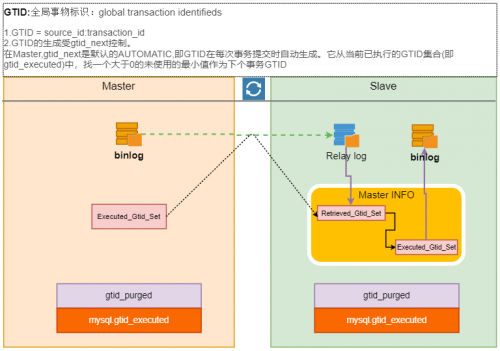
基于GTID的流程图:

GTID 相比binlog复制的优势
如果传统复制一主两从的情况下.如果了两个从库数据并不是同步的.那么在主库挂了以后重新指向最新数据的从库为主库的时候就会出现数据
不一致的情况.因为之前两个数据库中的数据是从master中同步的.而重新指向的新的从库为主库的情况下数据较全的从库并不会将数据同步到
新的2号从库中.就会导致数据差异.需要人工干预来找到binlog日志中2号数据库日志的偏移量.与1号主库binlog中的日志偏移量查找.然后进
行指向相应的位置才可以不丢数据的进行数据恢复.然后所以就出来了GRID复制.
1.gtid复制先决条件
1.配置两台机器使用gtid复制的时候首先要确认机器上的server_id是不相同的.在配置文件中或者在系统环境变量中可以查看当前机器的server_id号码.
设置范围是1-4294967295.同一个复制集群内这个id是不能重复的.
2.server_uuid: server_uuid会在Gtid复制中使用.是某个数据实例的唯一标识.跟上面的server_id类似.是主机的唯一标识.
2.基于gtid复制的主从搭建(切忌:不要从库不要reset master:)
环境:
[root@node241 ~]# cat /etc/redhat-release
CentOS Linux release 7.6.1810 (Core)
[root@node241 ~]# uname -a
Linux node241 3.10.0-957.el7.x86_64 #1 SMP Thu Nov 8 23:39:32 UTC 2018 x86_64 x86_64 x86_64 GNU/Linux
[root@node241 ~]# rpm -qa | grep mysql
mysql-community-client-plugins-8.0.25-1.el7.x86_64
mysql-community-libs-8.0.25-1.el7.x86_64
mysql-community-devel-8.0.25-1.el7.x86_64
mysql-community-common-8.0.25-1.el7.x86_64
mysql-community-client-8.0.25-1.el7.x86_64
mysql-community-server-8.0.25-1.el7.x86_64
mysql-community-libs-compat-8.0.25-1.el7.x86_64
主机清单:
主机名 IP 功能
node240 172.16.1.240 MySQL主库
node241 172.16.1.241 MySQL从库
在主库配置复制时使用的用户权限:
创建同步用户
CREATE USER 'repl'@'%' IDENTIFIED WITH mysql_native_password BY 'Rscpass123.';
GRANT REPLICATION SLAVE ON *.* TO 'repl'@'%';
1.将主从库中配置gtid复制模式开启等参数.(主从数据库都要开启)
主库:
[mysqld]
server-id = 11
gtid_mode = ON
enforce_gtid_consistency = ON
sync-binlog = 1
innodb_flush_log_at_trx_commit=1
binlog_expire_logs_seconds=864000
binlog_cache_size=65536
skip-name-resolve = 1
event_scheduler=ON
open_files_limit=10000
innodb_thread_concurrency = 4
max_allowed_packet = 128M
max_connections = 9190
max_connect_errors = 10000
key_buffer_size = 128M
long_query_time = 1
sql_mode=''
group_concat_max_len=200000000
table_open_cache=400
thread_cache_size=1000
log_timestamps=SYSTEM
innodb_print_all_deadlocks=on
innodb_lock_wait_timeout=10
innodb_io_capacity=2000
innodb_io_capacity_max=3000
innodb_flush_method=O_DIRECT
innodb_flush_neighbors=0
sort_buffer_size = 2M
join_buffer_size = 2M
read_buffer_size = 2M
read_rnd_buffer_size = 2M
innodb_sort_buffer_size = 4M
table_definition_cache=2000
tmp_table_size = 128M
max_heap_table_size = 512M
bulk_insert_buffer_size = 64M
innodb_temp_data_file_path = ibtmp1:12M:autoextend:max:1G
innodb_buffer_pool_size = 1024M
innodb_log_buffer_size = 32M
innodb_read_io_threads = 4
innodb_write_io_threads = 4
innodb_thread_concurrency = 4
default_authentication_plugin=mysql_native_password
从库:
[mysqld]
server-id = 12
gtid_mode = ON
enforce_gtid_consistency = ON
relay-log=relay-bin
relay-log-index=relay-bin.index
read-only = 1
master_info_repository=TABLE
relay_log_info_repository=TABLE
binlog_cache_size=65536
relay_log_recovery=ON
log_slave_updates=on
log_timestamps=SYSTEM
sql_mode=''
group_concat_max_len=200000000
table_open_cache=400
table_definition_cache=2000
skip-name-resolve = 1
max_allowed_packet = 128M
max_connections = 9190
max_connect_errors = 100000
thread_stack = 1024K
thread_cache_size=1000
open_files_limit=10000
net_read_timeout=600
net_write_timeout=600
connect_timeout=60
sort_buffer_size = 2M
join_buffer_size = 2M
read_buffer_size = 2M
read_rnd_buffer_size = 2M
innodb_sort_buffer_size = 2M
thread_cache_size = 1000
key_buffer_size =128M
tmp_table_size = 128M
max_heap_table_size = 128M
bulk_insert_buffer_size = 64M
innodb_buffer_pool_size = 1024M
innodb_read_io_threads = 4
innodb_write_io_threads = 4
innodb_thread_concurrency = 4
innodb_log_buffer_size = 32M
innodb_flush_log_at_trx_commit=1
innodb_flush_method=O_DIRECT
innodb_io_capacity=2000
innodb_io_capacity_max=3000
innodb_flush_neighbors=0
binlog_expire_logs_seconds=864000
innodb_temp_data_file_path = ibtmp1:12M:autoextend:max:1G
max_execution_time=120000
default_authentication_plugin=mysql_native_password
2.重启主从数据库使之生效.
[root@node240~]#systemctl restart mysqld
[root@node241~]#systemctl restart mysqld
3.主库数据备份.
mysqldump -uroot -p'Rscpass123.' --all-databases --master-data=2 -R -E --triggers --single-transaction > /root/dbdump.db
4.数据传输到从库指定文件目录中,(已经做好秘钥认证);
scp ./dbdump.db root@172.16.1.241:/root/
5.从库数据恢复
进入/root目录
6.登陆从数据库数据库进行数据恢复.
mysql>source /root/dbdump.db;
查看purge参数,已忽略了主库导出时的事务:
mysql> show variables like '%purge%'
-> ;
+--------------------------------------+------------------------------------------+
| Variable_name | Value |
+--------------------------------------+------------------------------------------+
| gtid_purged | 19ebc1f3-c8d0-11eb-b86b-000c29306727:1-4 |
7.查看在主库上查看当前gtid事务节点位置:
mysql> show master status;
+---------------+----------+--------------+------------------+------------------------------------------+
| File | Position | Binlog_Do_DB | Binlog_Ignore_DB | Executed_Gtid_Set |
+---------------+----------+--------------+------------------+------------------------------------------+
| binlog.000009 | 424 | | | 19ebc1f3-c8d0-11eb-b86b-000c29306727:1-4|
+---------------+----------+--------------+------------------+------------------------------------------+
1 row in set (0.00 sec)
mysql>CHANGE MASTER TO MASTER_HOST="172.16.1.240", MASTER_PORT=3306, MASTER_USER="repl", MASTER_PASSWORD="Rscpass123.", MASTER_AUTO_POSITION=1;
mysql>start slave
9.查看同步状态
show slave status\G
微信公众号视频讲解:https://mp.weixin.qq.com/s/OQ6_ajX5lFeEE5NYmbRWtQ


 MySQL8.0.25-基于GTID复制配置
