| Oracle® Database Storage Administrator's Guide 11g Release 2 (11.2) Part Number E10500-02 |
|
|
View PDF |
| Oracle® Database Storage Administrator's Guide 11g Release 2 (11.2) Part Number E10500-02 |
|
|
View PDF |
Oracle ASM Configuration Assistant (ASMCA) supports installing and configuring ASM instances, disk groups, volumes, and Oracle Automatic Storage Management Cluster File System (Oracle ACFS). In addition, you can use the ASMCA command-line interface as a non-GUI utility.
This chapter discusses the following topics:
This section contains the following topics:
Managing Oracle ASM Instances With Oracle ASM Configuration Assistant
Upgrading an Oracle ASM Instance with Oracle ASM Configuration Assistant
Managing Disk Groups With Oracle ASM Configuration Assistant
Managing Oracle ADVM Volumes With Oracle ASM Configuration Assistant
Managing Oracle ACFS File Systems With Oracle ASM Configuration Assistant
To start ASMCA, enter asmca at a command prompt inside the Oracle grid infrastructure home. For example:
$ asmca
The GUI tool displays and attempts to connect to Oracle ASM instance identified with the Oracle system identifier (SID) set to +ASM.
If ASMCA detects an Oracle ASM instance that is not running, ASMCA prompts whether you want to start the instance.
If ASMCA detects an Oracle ASM instance from a previous release, ASMCA prompts whether you want to upgrade the instance. Oracle recommends that you respond No this prompt.
An Oracle ASM instance should be upgraded with Oracle Universal Installer (OUI). OUI automatically defaults to upgrade mode when it detects an Oracle ASM instance at a previous release level. See "Upgrading an Oracle ASM Instance With Oracle Universal Installer".
To continue the upgrade process with ASMCA, see "Upgrading an Oracle ASM Instance with Oracle ASM Configuration Assistant". If you need help with upgrading an Oracle ASM instance, contact Oracle Support Services.
To start the command-line ASMCA, see "Oracle ASM Configuration Assistant Command-Line Interface".
Oracle ASM Configuration Assistant enables you to create an Oracle ASM instance if an Oracle ASM instance is not found on the host, as shown in Figure 11-1.
On the Create ASM page, you enter the SYS password for the administrator of the Oracle ASM instance and the password for the user that can monitor this Oracle ASM instance. You can select the listener with which you want to register this Oracle ASM instance. Click ASM Parameters to update the initialization parameters for the Oracle ASM instance.
Figure 11-1 Oracle ASM Configuration Assistant Create ASM Page

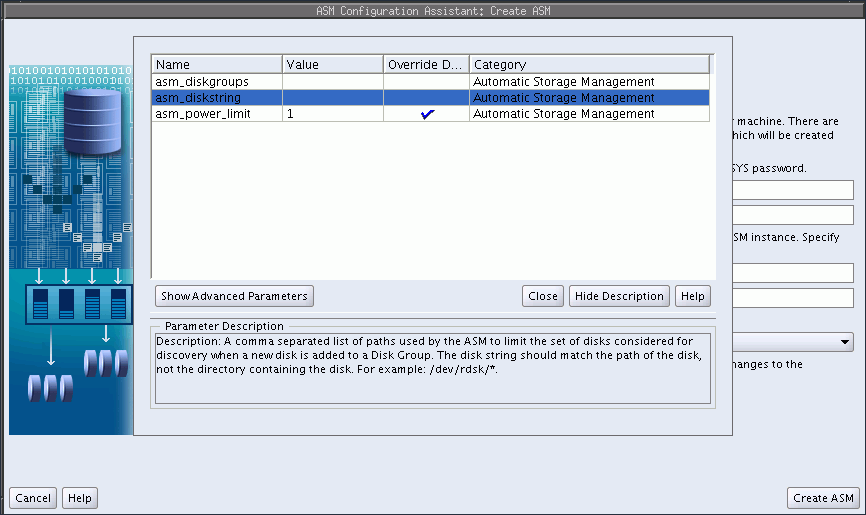
When you can click ASM Parameters in the Create ASM page, you can update initialization parameters for an Oracle ASM instance on the Oracle ASM Configuration Assistant page, as shown in Figure 11-2.
For information about Oracle ASM instance initialization parameters, see "Configuring Initialization Parameters for an Oracle ASM Instance".
Figure 11-2 Oracle ASM Configuration Assistant Create ASM Page
Oracle ASM Configuration Assistant also enables you to upgrade an existing Oracle ASM instance to the current software level. However, the recommended practice is to upgrade an Oracle ASM instance with Oracle Universal Installer (OUI). OUI automatically defaults to upgrade mode when it detects an Oracle ASM instance at a previous release level. See "Upgrading an Oracle ASM Instance With Oracle Universal Installer".
The following procedure describes how to upgrade an Oracle ASM instance from 11g Release 1 (11.1) to 11g Release 2 (11.2). In this scenario:
The Oracle ASM and Oracle Database instances 11g Release 1 (11.1) exist in separate homes.
The Oracle grid infrastructure software 11g Release 2 (11.2) is installed in a separate home.
The Oracle ASM instance 11g Release 2 (11.2) is set up as an Oracle Restart (single-instance) configuration.
Shut down the Oracle Enterprise Manager agent, Oracle Database instance, and the listener the in the older database home.
Run emctl stop dbconsole to stop the Oracle Enterprise Manager agent.
Connect to the database instance with SQL*Plus as a privileged user and issue the SHUTDOWN command.
Run lsnrctl and enter the STOP command to stop the listener.
See Also:
Oracle Enterprise Manager manuals and online help for information about starting and stopping the Oracle Enterprise Manager agent
Oracle Database Administrator's Guide for more information about starting up and shutting down Oracle instances
Oracle Database Net Services Administrator's Guide fro information about configuring a listener
Run the Oracle Universal Installer (OUI) and select the Install Oracle grid infrastructure Software Only option.
Complete the screens in the OUI installer and run the scripts as prompted by the OUI installer.
For example, on Linux you must run the root.sh script as the root user.
# GRID_HOME/grid/perl/bin/root.sh
When you run the root.sh script on Linux, note the instructions in the output of that script. You must run different scripts as root to configure either a standalone (single-instance) or cluster configuration after OUI has completed.
See Also:
Oracle Grid Infrastructure Installation Guide for information about installing Oracle grid infrastructureAfter the OUI has completed, perform the procedures that are described in the output of the root.sh script that you ran during the installation.
For example, for a standalone (single-instance) configuration on Linux, run the following script as root to upgrade the necessary services, including Oracle Cluster Synchronization Services (CSS).
# GRID_HOME/grid/perl/bin/perl -I/GRID_HOME/perl/lib -I/GRID_HOME/crs/install
 GRID_HOME/crs/install/roothas.pl
For an upgrade, you must update the node list by running OUI as the installation user in the Oracle grid infrastructure home.
$ GRID_HOME/oui/bin/runInstaller -updateNodeList -silent -local CRS=false
  ORACLE_HOME=ASM_11G_R1_HOME

$ GRID_HOME/oui/bin/runInstaller -updateNodeList -silent -local CRS=true
  ORACLE_HOME=GRID_HOME
Ensure that the current Oracle Cluster Synchronization Services (CSS) are running in the home where the Oracle ASM instance is located. For example:
On Linux run the crsctl check css command. If the CSS daemon is not running, run localconfig add as the root user.
On Windows, you can use the crsctl and localconfig commands or the Windows Services GUI tool. To use Windows Services GUI tool, double-click the Services icon in the Windows Control Panel and locate the OracleCSService service. The status of OracleCSService should be Started and its startup type should be Automatic.
Run the Network Configuration Assistant (NETCA) to configure the listener.
Start Network Configuration Assistant (NETCA) in the Oracle grid infrastructure home with netca. Follow the prompts in the wizard to add and configure the listener in the Oracle grid infrastructure home.
Run ASMCA from the Oracle grid infrastructure home to complete the upgrade.
For information about starting ASMCA, see "Starting Oracle ASM Configuration Assistant". If the Oracle ASM instance has been shut down during the Oracle grid infrastructure configuration, start that instance when ASMCA prompts you to start that instance.
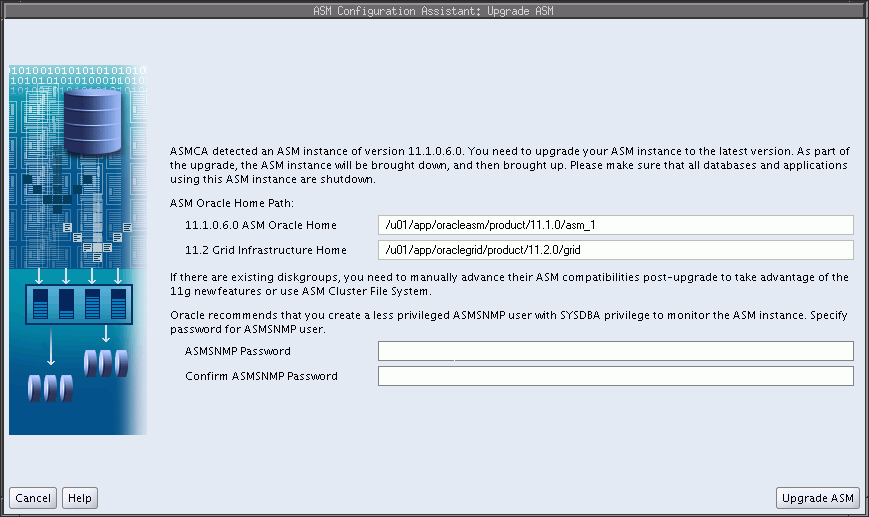
When ASMCA detects an earlier version of Oracle ASM, the assistant automatically determines the location of that instance and the location of the Oracle grid infrastructure home, as shown in Figure 11-3.
Enter a password for the ASMSNMP user, then select Upgrade ASM to complete the upgrade. When the process has completed, you can exit from ASMCA.
When upgrading an Oracle ASM instance to the current software level, ASMCA moves an Oracle ASM instance prior to 11g Release 2 (11.2) to the Oracle grid infrastructure home and updates the appropriate environmental variables.
Ensure that the Oracle Database instance and Oracle Enterprise Manager agent are running in the database home 11g Release 1 (11.1).
Start the following services if necessary.
Connect to the Oracle Database instance with SQL*Plus as a privileged user and issue the STARTUP command.
Restart the Oracle Enterprise Manager agent with emctl start dbconsole.
Note:
The procedure described in this section upgrades the Oracle ASM instance only. Oracle Database, and Oracle Enterprise Manager, will not have the latest features. To upgrade Oracle Database, see Oracle Database Upgrade Guide.Figure 11-3 Oracle ASM Configuration Assistant Upgrade ASM Page
After upgrading an Oracle ASM instance, you can copy or move an Oracle ASM. After copying or moving the SPFILE, you must restart the instance with the SPFILE in the new location to use that SPFILE. For information, see "Backing Up, Copying, and Moving an Oracle ASM Initialization Parameter File".
See Also:
Oracle Database Upgrade Guide for information upgrading an Oracle ASM instance
Oracle Grid Infrastructure Installation Guide for information about installing Oracle grid infrastructure and performing a rolling upgrade of Oracle ASM
Oracle ASM Configuration Assistant enables you to configure or create Oracle ASM disk groups with the Configure ASM Disk Groups tab, as shown in Figure 11-4. The disk group tab displays selected details about the disk group, such as name, size, free space, usable space, redundancy level, and state of the disk group.
See Also:
Oracle Database Reference for descriptions of disk group information displayed in theV$ASM_DISKGROUP viewYou can right click on a selected disk group in the screen to display the configuration options menu. The menu options enable you to:
Add disks to the disk group
Edit the disk group attributes
Manage templates for the disk group
Create an Oracle ACFS file system on the disk group for a database home
Dismount and mount the disk group
Drop the disk group
Figure 11-4 Oracle ASM Configuration Assistant Configure Disk Groups Page
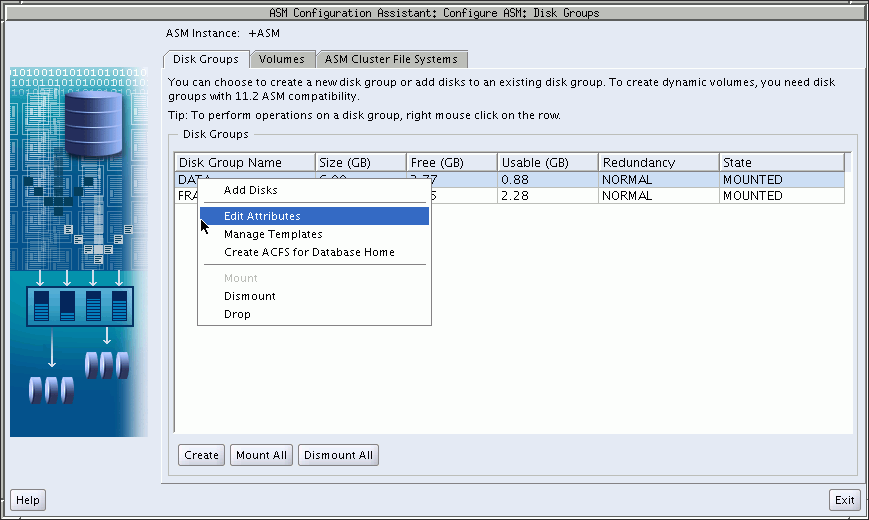
There are additional options for creating a disk group, mounting all disk groups, and dismounting all disk groups.
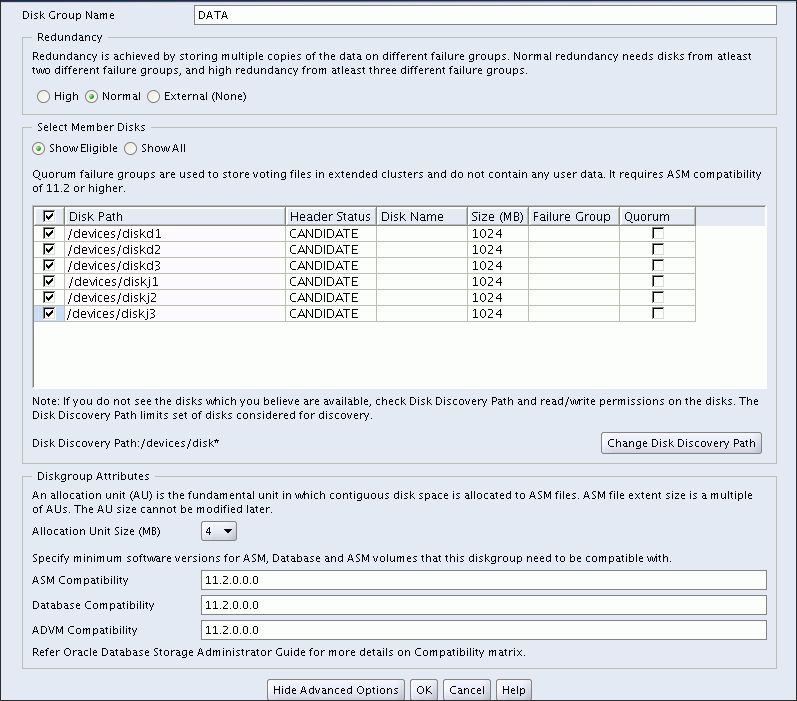
Oracle ASM Configuration Assistant enables you to create an Oracle ASM disk group by clicking Create on the Oracle ASM Configuration Assistant disk group page. The page for creating a disk group is shown in Figure 11-5.
Figure 11-5 Oracle ASM Configuration Assistant Create Disk Groups Page
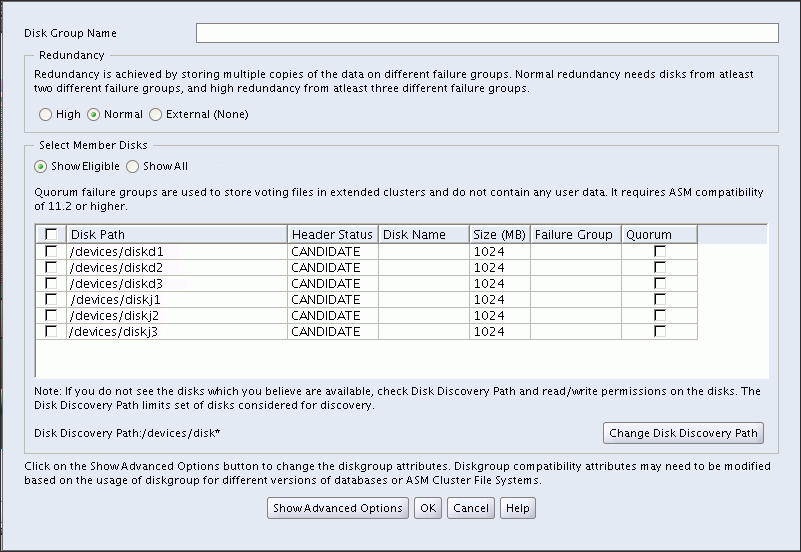
On this page, you can enter a name for the disk group, select the redundancy level, change the disk discovery path to locate disks in a different directory, identify the disks you want to be in the disk group, enter a name for a failure group, and specify if the failure group is a quorum type. A quorum failure group is a special type of failure group and disks in these failure groups do not contain user data and are not considered when determining redundancy requirements. For information about quorum failure groups, see "Oracle Cluster Registry and Voting Files in Oracle ASM Disk Groups".
The default disk group compatibility settings are 11.2 for Oracle ASM compatibility, 10.1 for database compatibility, and no value for Oracle ADVM compatibility. For information about disk group compatibility attributes, see "Disk Group Compatibility". For information about disk discovery, see "Oracle ASM Disk Discovery" and "ASM_DISKSTRING".
You can choose to show advanced options when creating a disk group, as shown in Figure 11-6. The advanced options page enables you to set additional options, such as disk group compatibility settings and allocation unit (AU) size. When you are finished with the create disk group specifications, click OK.
Note:
The disk group compatibility settings can only be advanced; you cannot revert to a lower compatibility setting. After you advance the disk group compatibility settings, you cannot change the values back to the previous settings. See "Overview of Disk Group Compatibility"Figure 11-6 Oracle ASM Configuration Assistant Create Disk Groups Page - Advanced Options
For more information about managing disk groups, see Chapter 4, "Administering Oracle ASM Disk Groups".
Oracle ASM Configuration Assistant enables you to create or configure an Oracle ADVM volume, as shown in Figure 11-7.
Right click a selected volume in the Oracle ASM Configuration Assistant screen to display the configuration options menu. The menu options include:
Enable a disabled volume
Disable an enabled volume
Resize the volume
Delete the volume
There are options for creating a volume, enabling all volumes, and disabling all volumes.
Figure 11-7 Oracle ASM Configuration Assistant Configure ASM Volumes Page
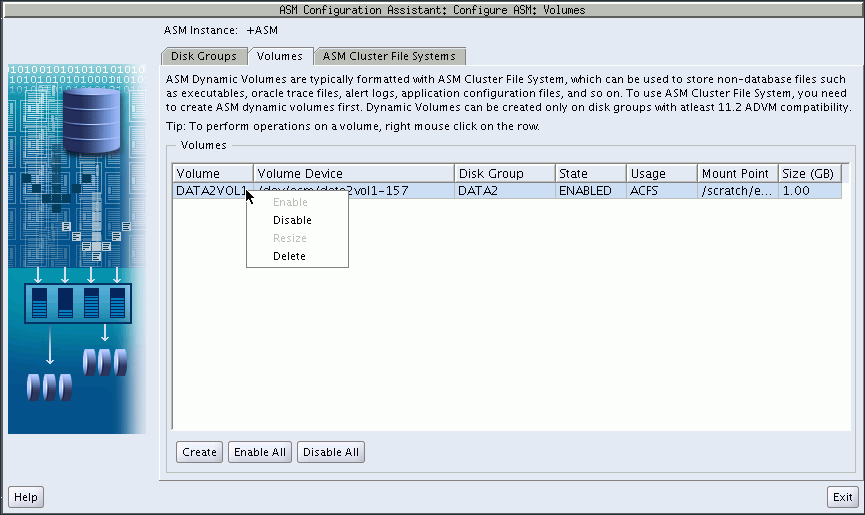
Oracle ASM Configuration Assistant enables you to create Oracle ADVM volumes, as shown in Figure 11-7.
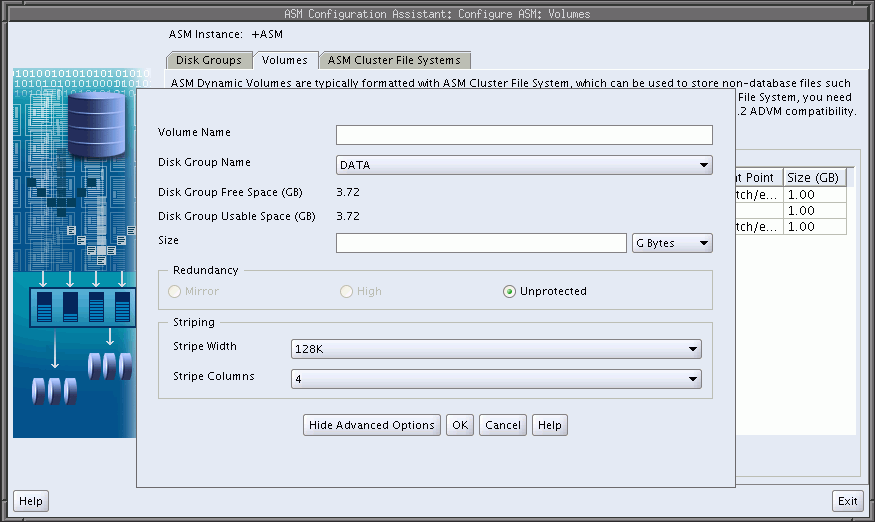
Click Create to create a volume. You must provide a unique volume name for the existing Oracle ASM disk group that you select from the list. The volume name can be a maximum of 11 alphanumeric characters; dashes are not allowed. The first character must be alphabetic.
Specify the size for the volume. You can optionally choose to display advanced options for creating a volume which enables you to specify the redundancy level and striping characteristics.
The compatibility parameters COMPATIBLE.ASM and COMPATIBLE.ADVM must be set to 11.2 or higher for the disk group. See "Disk Group Compatibility Attributes".
Figure 11-8 Oracle ASM Configuration Assistant Create an ASM Volume Page
For information about Oracle ACFS, see Chapter 5, "Introduction to Oracle ACFS".
Oracle ASM Configuration Assistant enables you to create or configure an Oracle ACFS file system, as shown in Figure 11-9.
To configure an existing file system, right click a selected file system in the Oracle ASM Configuration Assistant screen to display the configuration options menu.
The menu options include:
Show mount command for the file system
Show dismount command for the file system
Register mount point for the file system
Deregister mount point for the file system
Resize the file system
Delete the file system
Some commands require root privileges, such as mounting a file system. Oracle ASM Configuration Assistant generates the command for you to run manually as root or as a privileged user.
There are buttons for Create, Show Mount All, and Show Dismount All commands.
Figure 11-9 Oracle ASM Configuration Assistant Configure Oracle ACFS Page

Oracle ASM Configuration Assistant enables you to create an Oracle ACFS file system, as shown in Figure 11-9.
Select Create, then select an existing an existing Oracle ADVM volume from the list and determine the mount point, show in Figure 11-10. The mount point must be an existing directory. The file system must be mounted to make it available. The mount command must be manually executed as root or the Windows Administrator at an operating system prompt. For information about mounting an Oracle ACFS file system, see "mount" for Linux or "acfsmountvol" for Windows.
You can also choose to create an Oracle ACFS file system for an Oracle Database. For more information about creating a file system for a database home, see "Creating an Oracle ACFS File System for a Database Home".
Figure 11-10 Oracle ASM Configuration Assistant Create Oracle ACFS Page

For information about Oracle ACFS, see Chapter 5, "Introduction to Oracle ACFS". For a summary of the basic steps for creating an Oracle ACFS file system, see "Basic Steps to Manage an Oracle ACFS".
To create an Oracle ACFS file system for a database home, you can select the Create ACFS for Database Home from the disk group configuration options menu, as shown in Figure 11-4. The Create ACFS Hosted Database Home dialog displays as shown in Figure 11-11.
In this dialog, you must enter:
Database Home Volume Name
This is the name of the Oracle ADVM volume you want to create. For information about Oracle ADVM volumes, see "About Oracle ACFS".
Database Home Mount Point
This the mount point for the file system where you want to install the database home. The file system that contains the database home should not be located under the Oracle grid infrastructure base (ORACLE_BASE for grid) directory. For information about mount points and database homes, see "About Oracle ACFS and Oracle Database Homes".
Database Home Size in gigabytes (GB)
The default is 6 GB and the minimum size allowed.
Database Home Owner Name
This is the operating system name of the user that installs the database and owns the software in the database home.
Database Home Owner Group
This is the operating system group of the owner of the database home.
The mount point must be an existing directory. The file system must be mounted to make it available. The mount command must be manually executed as root or the Windows Administrator at an operating system prompt. For information about mounting an Oracle ACFS file system, see "mount" for Linux or "acfsmountvol" for Windows.
For information on the mount registry, see "About the Oracle ACFS Mount Registry".
Figure 11-11 Oracle ASM Configuration Assistant Create Oracle ACFS Hosted Database Home Page

The ASMCA command-line interface provides a non-GUI support for configuring Oracle ASM disk groups, volumes, and Oracle ACFS.
The syntax for running the ASMCA command-line tool is:
asmca -silent command_name [options]Table 11-1 contains the options available with the asmca command-line tool.
Table 11-1 Options for the asmca command-line tool
| Option | Description |
|---|---|
|
|
Specifies to run |
|
|
Specifies the command to run. The command can be any of the following:
See "ASMCA Commands". |
|
|
Specifies the options to run for a command. The options vary by command. See the individual commands described in "ASMCA Commands" for the available options. The following list describes the options common for multiple commands.
|
The following is an example of the -help option.
$ asmca -help
asmca [-silent] [-sysAsmPassword <SYS user password>] [-asmsnmpPassword <ASMSNMP password>] {<command> <options>}
Please refer to the manual for details.
You can enter one of the following commands:
...
This section describes the commands that can be run with ASMCA command-line.
-configureASM configures or creates an Oracle ASM instance.
Syntax
asmca -silent -configureASM [-sysAsmPassword sysasm_password ] [ -asmsnmpPassword asm_monitor_password ] [ { -param paramname=paramvalue , ... } ] [ { -diskString discovery_path -diskGroupName diskgroup -diskList disk_list [ -redundancy { HIGH | NORMAL | EXTERNAL } ] } ]Table 11-2 contains the options available with the -configureASM command.
Table 11-2 Options for the -configureASM command
| Option | Description |
|---|---|
|
|
Specifies a list of initialization parameters with values for the Oracle ASM instance. |
|
|
Specifies the Oracle ASM discovery string for locating disks. |
|
|
Specifies the name of the Oracle ASM disk group to create. |
|
|
Specifies a comma separated list of disk names to be added to the disk group. |
|
|
Specifies the redundancy setting for the disk group. |
For additional options that are common to multiple commands, see Table 11-1.
Examples
To configure an Oracle ASM instance:
-upgradeASM upgrades an Oracle ASM instance from a previous release to the current software release.
Upgrading an Oracle ASM instance with ASMCA only updates the Oracle ASM instance software and does not configure the Oracle Custerware or listener.
An Oracle ASM instance should be upgraded with Oracle Universal Installer (OUI). OUI automatically defaults to upgrade mode when it detects an Oracle ASM instance at a previous release level. See "Upgrading an Oracle ASM Instance With Oracle Universal Installer".
Syntax
asmca -silent -upgradeASMInstance [ -asmsnmpPassword asmsnmp_password ]The options available with the -upgradeASMInstance command are common to multiple commands. For a description of those options, see Table 11-1.
Examples
To upgrade an Oracle ASM instance:
-configureParameter modifies the parameters of an Oracle ASM instance.
Syntax
asmca -silent -configureParameter [ { -param paramname=paramvalue , ... } ] [-sysAsmPassword sysasm_password ]Table 11-3 contains the options available with the -configureParmeter command.
Table 11-3 Options for the -configureParameter command
| Option | Description |
|---|---|
|
|
Specifies a list of initialization parameters with values for the Oracle ASM instance. |
For additional options that are common to multiple commands, see Table 11-1.
Examples
To configure parameters for an Oracle ASM instance:
-deleteASM deletes an Oracle ASM instance. The operation stops and an error is raised if there is a database using the Oracle ASM instance.
Syntax
asmca -silent -deleteASM [-sysAsmPassword sysasm_password ] [ -force ] [ -dropDiskGroups ]Table 11-4 contains the options available with the -deleteASM command.
Table 11-4 Options for the -deleteASM command
| Option | Description |
|---|---|
|
|
Forces the deletion of an Oracle ASM instance. |
|
|
Drops the disk groups on this instance. |
For additional options that are common to multiple commands, see Table 11-1.
Examples
To delete an Oracle ASM instance:
-createDiskGroup creates disk groups in an Oracle ASM instance.
Syntax
asmca -silent -createDiskGroup [ -diskString discovery_path ] { -diskGroupName diskgroup { -disk disk_path [-diskName disk] | -diskList disk_list [-diskSize disk_size_MB] [-failuregroup failure_group] [-force|-noforce] [-quorum|-noquorum] } [ -redundancy { HIGH | NORMAL | EXTERNAL } ] } ] [-au_size value] [-compatible.asm value ] [-compatible.rdbms value ] [-compatible.advm value ] } [-sysAsmPassword sysasm_password ]Table 11-5 contains the options available with the -createDiskGroup command.
Table 11-5 Options for the -createDiskGroup command
| Option | Description |
|---|---|
|
|
Specifies the Oracle ASM discovery string for locating disks. |
|
|
Specifies the name of the Oracle ASM disk group to create. |
|
|
Specifies the full path of the disk device. |
|
|
Specifies a user-supplied disk name. |
|
|
Specifies a comma separated list of disk names to be added to the disk group. |
|
|
Specifies the size of the disk to use for Oracle ASM storage. |
|
|
Specifies the failure group name. |
|
|
Specifies where to force the use of the disk. |
|
|
Specifies a quorum or standard failure group. |
|
|
Specifies the redundancy setting for the Oracle ASM disk group. |
|
|
Specifies the allocation unit size (1,2,4,8,16,32,64) |
|
|
Specifies the attribute setting (10.1 to 11.2) |
|
|
Specifies the attribute setting (10.1 to 11.2) |
|
|
Specifies the attribute setting (empty or 11.2) |
For additional options that are common to multiple commands, see Table 11-1.
The default disk group compatibility settings are 11.2 for Oracle ASM compatibility, 10.1 for database compatibility, and no value for Oracle ADVM compatibility. For information about disk group compatibility attributes, see "Disk Group Compatibility".
Examples
To create disk groups in an Oracle ASM instance:
Example 11-5 Using asmca -silent -createDiskGroup
$ asmca -silent -createDiskGroup
       -diskGroupName mynewdg
           -disk '/devices/diske*'
           -disk '/devices/diskk*'
       -redundancy NORMAL
       -au_size 64
       -compatible.asm '11.2.0.0.0'
       -compatible.rdbms '11.2.0.0.0'
       -compatible.advm '11.2.0.0.0'

DiskGroup mynewdg created successfully.
-addDisk add disks to an existing disk group in an Oracle ASM instance.
Syntax
asmca -silent -addDisk [ -diskString discovery_path ] { -diskGroupName diskgroup { -disk disk_path [-diskName disk] | -diskList disk_list [-diskSize disk_size_MB] [-failuregroup failure_group] [-force|-noforce] [-quorum|-noquorum] } [-sysAsmPassword sysasm_password ]Table 11-6 contains the options available with the -addDisk command.
Table 11-6 Options for the -addDisk command
| Option | Description |
|---|---|
|
|
Specifies the Oracle ASM discovery string for locating disks. |
|
|
Specifies the name of the Oracle ASM disk group to update. |
|
|
Specifies a comma separated list of disk names to be added to the disk group. |
|
|
Specifies the size of the disk to use for Oracle ASM storage. |
|
|
Specifies the failure group name. |
|
|
Specifies where to force the use of the disk. |
|
|
Specifies a quorum or standard failure group. |
For additional options that are common to multiple commands, see Table 11-1.
Examples
To add disks to an existing disk group:
-createVolume creates Oracle ADVM volumes.
Syntax
asmca -silent -createVolume { -volumeName volume_name -volumeDiskGroupName diskgroup -volumeSizeGB size_GB [ -volumeRedundancy { INHERIT | HIGH | NORMAL | EXTERNAL } ] ... } [-sysAsmPassword sysasm_password ]Table 11-7 contains the options available with the -createVolume command.
Table 11-7 Options for the -createVolume command
| Option | Description |
|---|---|
|
|
Specifies the name of the volume to create. |
|
|
Specifies the name of the disk group where you want to create the volume. |
|
|
Specifies the size of the volume in Gigabytes.. |
|
|
Specifies the redundancy setting for the volume.. |
For additional options that are common to multiple commands, see Table 11-1.
Examples
To create an Oracle ADVM volume:
-createACFS creates an Oracle Automatic Storage Management Cluster File System (Oracle ACFS).
This command does not mount the Oracle ACFS file system. For information about mounting an Oracle ACFS file system, see "mount" for Linux environments and "acfsmountvol" for Windows environments.
Syntax
asmca -silent -createACFS { -acfsVolumeDevice volume_device } [-sysAsmPassword sysasm_password ]Table 11-8 contains the options available with the -createACFS command.
Table 11-8 Options for the -createACFS command
| Option | Description |
|---|---|
|
|
Specifies the name of the Oracle ADVM volume device. |
For additional options that are common to multiple commands, see Table 11-1.
Examples
To create an Oracle ACFS file system: